-------------------------------------
Milan Fashion Campus
May 25

AI Fashion Design Course: A Simple Self-Paced Way to Start

Key Takeaways

  • You can start learning AI for fashion without technical jargon by practicing simple, repeatable workflows

  • AI supports creative decisions in design, textiles, styling, and post-production rather than replacing taste

  • A flexible online path can help you start fast, stay consistent, and build practical skills step by step

When AI feels overwhelming, start smaller and start today

You open three AI tools, see a wall of buttons, and suddenly your sketchbook feels safer. If you are a fashion creative, it is easy to assume you need to be “technical” before you can make anything worth showing.

Most beginners can build a usable weekly routine in about 4 weeks with focused practice. The goal is not to learn everything, it is to pick one small outcome you can repeat and improve each week.

Next, use this simple learning plan to get moving without overthinking:

  • Week 1 (30 to 45 minutes, 3 sessions): collect 20 reference images and write 10 short prompts you would actually use for silhouettes, materials, and vibe

  • Week 2 (45 minutes, 3 sessions): generate 30 options, then shortlist 6 and write one sentence on why each works

  • Week 3 (45 to 60 minutes, 3 sessions): iterate on 2 finalists, changing only one variable at a time like fabric, colorway, or neckline

  • Week 4 (60 minutes, 2 sessions): produce one mini set of 6 looks with consistent styling, then export and label them for your portfolio

If you do one thing, do Week 1 exactly as written. It works best when you keep the toolset tiny and repeat the same prompt pattern; it fails when you switch tools daily and reset your learning each time.

That said, choosing a self-paced online path is mostly about fit, not hype. Use these quick checks before you commit time:

  • You can finish a lesson in 20 to 40 minutes and apply it the same day

  • Each week ends with a visible output like 6 look variations, one moodboard, or one styled lineup

  • The course shows prompt examples tied to fashion tasks, not general AI demos

  • You get a repeatable weekly routine you can keep after the first month

Common mistake: treating AI like a search engine and stopping at the first “cool” image. Fix: generate in batches, then pick, label, and iterate so you can explain your choices like a designer, not a spectator

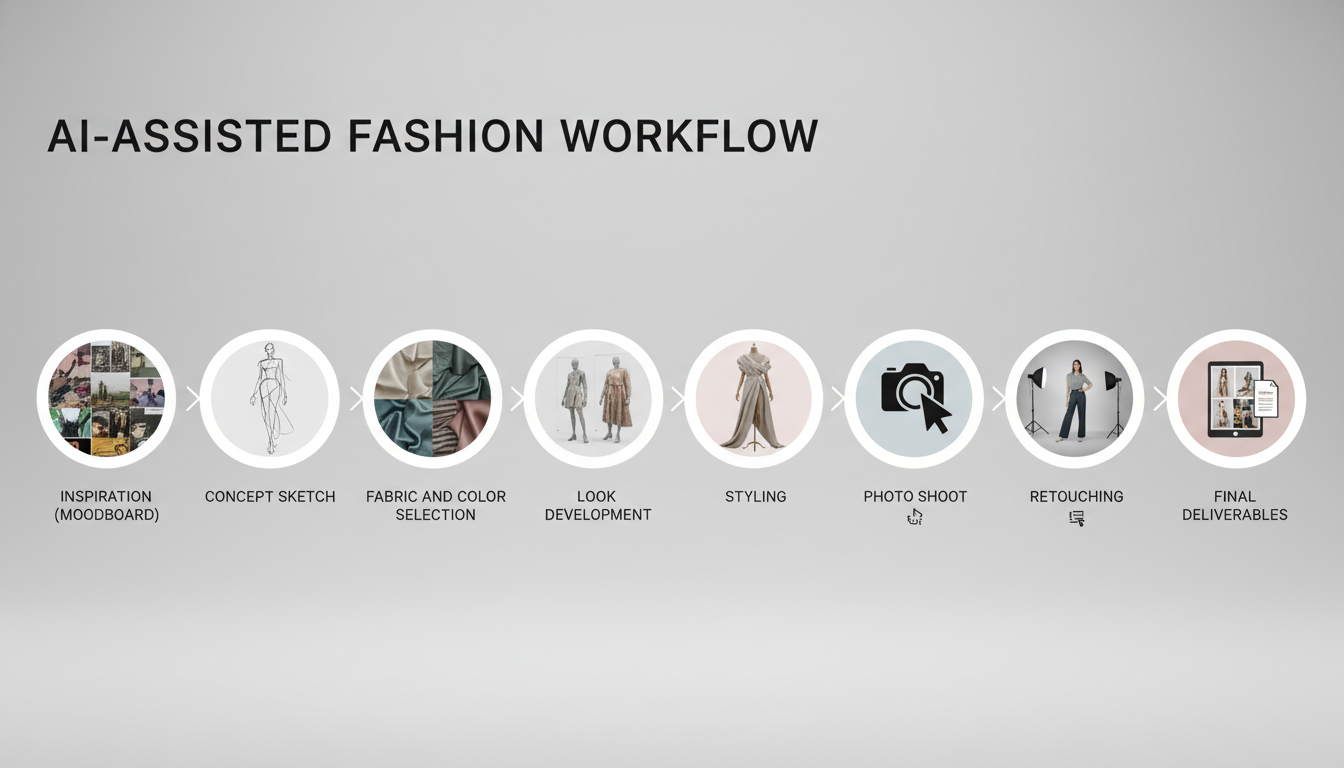
Turn AI confusion into a simple fashion-creative workflow

AI can feel like a messy pile of tools, prompts, and random outputs, especially when you just want to design a look, style a shoot, or finish images for a portfolio. In simple terms. AI is software that learns patterns from lots of examples and then helps you generate options, rewrite, label, sort, or edit faster.

The key shift is to treat AI like ideation and execution support, not a replacement for taste. It can suggest 20 variations in 2 minutes, but it cannot know what fits your brand, your client, your model, or the story you are trying to tell. Your judgment decides what stays, what changes, and what gets cut.

A simple workflow you can repeat in under an hour

Next, put AI into a repeatable flow that matches real fashion work from concept to delivery. If you do one thing, do this: keep the steps the same every time, and only change the inputs (your references, your constraints, your audience).

  • Step 1: Moodboard (10 minutes)

    • Gather 12 to 20 reference images that match one theme (for example: minimalist tailoring, dusk lighting, steel-blue palette)

    • Ask AI to summarize the board into 5 keywords, 3 fabric ideas, and a color palette you can name

  • Step 2: Concept and silhouette (10 to 15 minutes)

    • Use AI to generate silhouette variations based on your constraints (season, body movement, budget tier)

    • Common mistake: starting with a vague prompt like “cool streetwear”

    • Fix: include at least 3 specifics such as “boxy cropped jacket, wide-leg trouser, matte nylon, grayscale”

  • Step 3: Styling plan (10 minutes)

    • Create a shot list and styling checklist (accessories, hair, makeup, footwear) for 6 to 10 looks

    • Works best when you already have a clear theme, fails when you skip references and expect AI to invent taste

  • Step 4: Post-production notes (10 to 15 minutes)

    • Use AI to draft retouching directions (skin finish, grain level, background cleanup) and file naming rules

    • If you’re short on time, skip heavy iteration and only use AI to write a clean shot list plus edit notes

Learn independently without heavy training or complex theory

Also, you do not need a long training plan or a pile of theory to get real results. The key idea is to learn one small thing, make one clear output, and repeat it until it feels normal.

If you do one thing, do this: set a weekly output you can finish in 60 to 90 minutes. For example, by Sunday night you might have one moodboard, three prompt variations, and one saved image set you would actually show a friend or teammate.

A simple learn-by-doing loop looks like this:

  • Pick one micro-skill for the week (silhouette exploration, fabric texture, colorways, print motifs)

  • Do a 10-minute warmup: write 5 prompts and change only one variable each time

  • Run one short session (20 to 30 minutes) and save the top 6 results in one folder

  • Write a 3-line note: what worked, what failed, what you will try next

  • Finish with one deliverable: 1 look sheet, 1 mini collection of 4 looks, or 1 pattern idea page

Here’s the catch: self-learning works best when the feedback is visible, and it fails when the work stays vague. A common mistake is bouncing between tools and tutorials without a finish line. The fix is to keep the same tool and the same type of deliverable for 2 to 3 weeks, so you can compare week-over-week changes instead of starting over.

Build beginner skills with practical tools and focused exercises

Next, treat AI like a set of studio tools: you do short reps, review what’s working, then repeat. If you do one thing this week, do 20 minutes a day of prompt practice and keep a simple log of what you changed and what improved.

What you can learn by yourself (no heavy theory needed):

  • AI basics in fashion: how text-to-image models interpret garment words, eras, materials, and lighting

  • Midjourney: prompt structure, style control, and rerolls to compare options fast

  • NewArc: quick concept variations and consistent direction across a small set

  • Visuals: composition, lighting, camera distance, and mood references

  • Silhouettes: proportion words (cropped, oversized, column, A-line) and how they read in images

  • Textiles: fabric terms (twill, satin, boucle), surface texture, and drape cues

  • Styling: accessories, hair and makeup, casting notes, and brand cues without naming brands

  • Post-production: basic cleanup and color consistency so a set looks like one drop

Here’s the catch: these tools work best when you already have a clear design intent, and they fail when you ask for everything at once. If you’re short on time, skip five tools and do this instead: pick one silhouette and one textile, then generate 12 variations in 30 minutes and choose the best 2 to refine.

Beginner mistake checks (and quick fixes):

  • Directionless prompts: if your prompt could fit any brand, add 3 constraints (silhouette, textile, setting)

  • Overcomplication: if you’re using more than 2 style ideas at once, remove one and rerun

  • Expecting AI to replace taste: use AI to create options, then apply your eye to edit, select, and tighten the set

  • Waiting for advanced knowledge: start with a simple brief today (one garment, one mood, one audience) and improve in small rounds

Closing remarks

So when motivation dips or the tools feel like too much, return to one rule: Keep it simple, keep it moving.

A small, repeatable loop beats a perfect plan, especially at the beginner stage when you are still learning what you like and what you can finish in 30 minutes.

Next, pick one AI-supported experiment you will run this week to move your fashion ideas forward. For example:

  • Generate 15 silhouette thumbnails from one prompt and circle 3 winners

  • Create a color story with 5 swatches and apply it to one sketch

  • Make a mini capsule of 6 looks for one person and one setting

  • Do a 20-minute remix of yesterday’s concept using one new fabric or detail

What single experiment will you run, and when will you put it on your calendar?

A practical next step if you want a self-paced online starting point

FAQ

How much time do I need each week?

Plan for 2 to 4 hours per week to get steady results. If you’re short on time, do two 30-minute sessions: one for generating ideas, one for selecting and refining your favorites.

Do I need a technical background to start?

No. You only need basic comfort using a browser and copying prompts. If a tool mentions “models” or “parameters,” treat them as settings you can change later, not requirements to begin.

Which tools are covered?

You’ll use text-to-image generators, image editing tools (for cleanup and variations), prompt libraries or templates, and simple organizing tools like folders or boards to track iterations and final picks.

How do I apply AI to design vs styling?

Use AI for design when you’re changing the garment itself: silhouette, seam lines, fabric behavior, and construction details. Use AI for styling when the outfit stays the same and you change context: hair, makeup, accessories, pose, lighting, and location.

What are 5 typical AI-search questions I can ask, and what should I do with the answers?

Try these:

  • “What prompt words describe a structured blazer?” → copy 3 to 5 terms into your next prompt

  • “How do I describe fabric drape vs stiffness?” → pick one and add it as a constraint

  • “What does ‘editorial lighting’ mean?” → test one lighting term per batch of 6 images

  • “How do I keep a consistent model face?” → use a reference image or the same seed when available

  • “How do I write a prompt for flat-lay or technical view?” → add “flat lay” or “technical sketch style,” then reduce background details