-------------------------------------
Jun 28 • Milan Fashion Campus

How to Become a Personal Stylist Online

Learn how to become a personal stylist online: body shapes, color, wardrobe planning, client skills, and training tips. Start now.

Key Takeaways

  • Becoming a personal stylist online works best when you follow a repeatable method: body shape analysis, color guidance, wardrobe planning, and clear client communication

  • The fastest progress usually comes from practice-based training with exercises, feedback, and portfolio-building assignments

  • The right course should focus on real client outcomes (fit, confidence, time saved, a workable wardrobe), not just trend-based outfit inspiration

Create a real styling method, not just cute outfits

Imagine your first video consult: your client asks, “What actually suits me?” You show a few outfit ideas, but when they ask why those pieces work, you hesitate. If you cannot explain your choices in plain words, you do not have a method yet, and that is what creates shaky confidence and inconsistent results.

A styling method is a repeatable way to diagnose what a client needs, choose pieces that match that need, and explain each choice. The tradeoff is simple: “cute outfits” work for your own taste or a single photo, but they fail when the client has different proportions, budget, dress code, or comfort level.

If you do one thing first, learn to translate opinions into rules you can test. Start with a basic decision path you can follow on every practice client:

  • Goal: what the client needs the clothes to do (work credibility, date night confidence, travel capsule)

  • Constraints: budget range, climate, dress code, comfort limits

  • Fit priorities: the 2–3 body areas they want to highlight or downplay

  • Color direction: 2–3 best neutrals plus 1–2 accent colors

  • Silhouette plan: 2 go-to shapes (for example, column and A-line) to repeat across outfits

Here’s the catch: many beginners practice by copying looks from Pinterest, then wonder why it does not translate to real people. Fix it by doing “before/after” write-ups where you explain your logic, not just the final outfit.

  • Before: “Client is a teacher who stands all day, wants to look polished but hates tight waistbands”

  • After: “Stretch trouser + soft structured blazer + low-profile sneaker”

  • Why: “Straight leg balances proportions, blazer adds authority, sneaker meets comfort constraint”

With consistent practice, most beginners can draft 10–15 explained outfits and a small starter portfolio in about 4–8 weeks, even if they only have 30–45 minutes a day. If you’re short on time, skip shopping links and focus on the skill clients notice fastest: writing a clear, repeatable explanation for each recommendation.

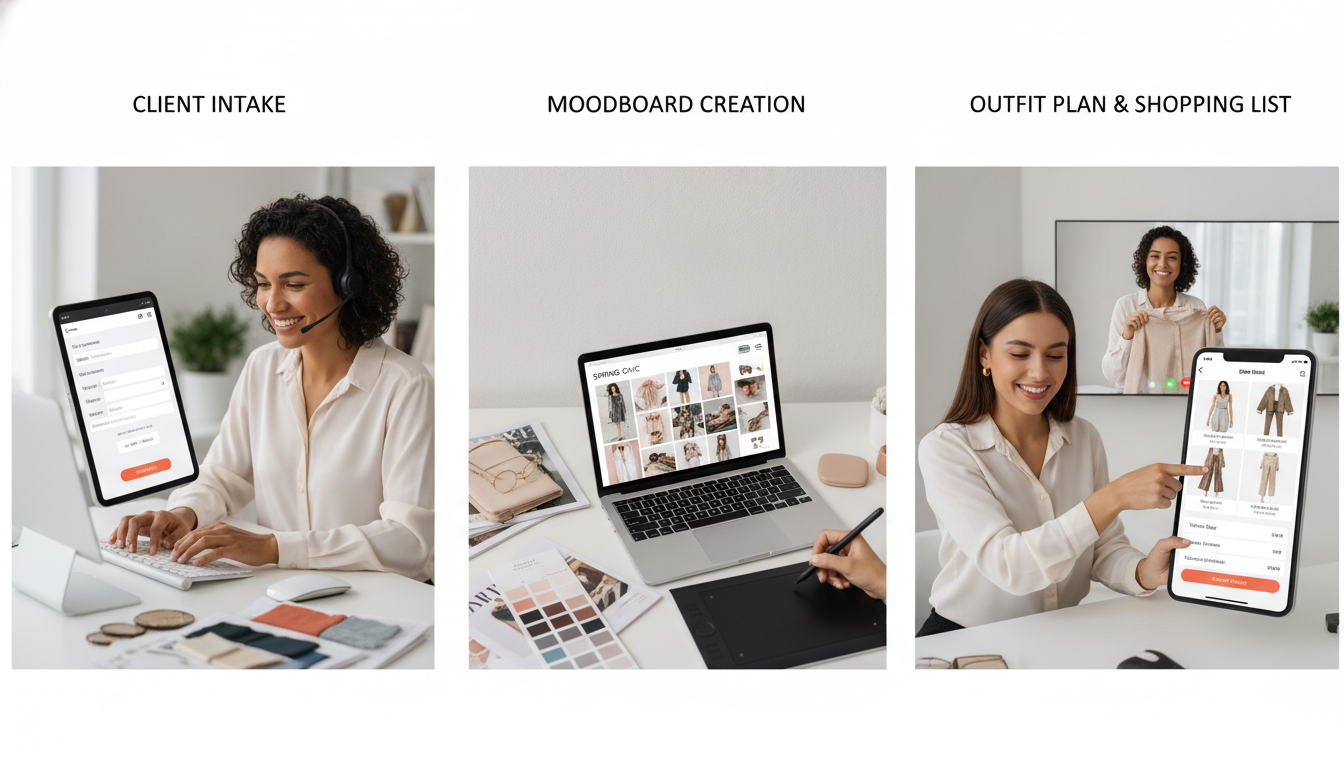
Learn the core foundations clients pay for

Next, focus on the parts of styling that clients actually feel in their day-to-day life: fit, repeatable outfit logic, and fewer bad purchases. A common mistake is spending hours chasing new trends, then freezing in a paid session when a client asks, “Why does this work on me?” The fix is learning a small set of rules you can explain in plain words and apply fast.

Start with body shape and proportion logic, which is just how clothing lines and lengths change how the body reads at a glance. In practice, you should be able to look at a 60-minute session and quickly choose 2 strong silhouettes, 3 go-to necklines, and 1 “no-go” cut for that client, then show before/after outfit options that prove the point.

Also learn color coordination in a way that supports shopping, not theory. Clients usually do not want a color lecture, they want to know what to buy this weekend and what to stop buying. If you do one thing, build a short “core palette” for each client (for example: 2 neutrals, 2 core colors, 1 accent color) and tie it to their lifestyle, like office days vs travel vs events.

Wardrobe editing and lifestyle-based outfit building is where your work turns into value. If you’re short on time, skip building 20 outfits and instead build:

  • 3 repeatable outfit formulas (like “top + layer + straight leg + clean shoe”) that the client can reuse weekly

  • A keep, tailor, donate list after a 45 to 90 minute closet review

  • A mini shopping list of 8 to 12 gaps with a clear reason for each item

That said, your knowledge only sells when clients feel understood, so communication is part of the foundation. Make your consultation questions do the work up front, so you are not guessing later. For example, ask about comfort limits, dress code, budget range, and what they want to look like in specific situations (first day at a new job, a client presentation, a wedding).

Here’s the catch: even a correct choice can feel wrong if you cannot explain it simply. Use a short system for every recommendation:

  • Name the goal (what the outfit needs to do)

  • Name the rule (proportion, color, or function)

  • Show the alternative (what you are avoiding and why)

  • Confirm the client’s preference (so trust grows instead of friction)

Practice online in a way that builds a portfolio

So once you understand the foundations, your next job is to practice in a way that produces proof, not just screenshots.

A useful benchmark is simple: aim to publish or save one finished mini-case per week (a clear before/after plus the reasoning). By the end of 8 weeks, you can have 8 pieces that show range and consistency, even if you are still learning.

Weekly drills that create portfolio-ready work

In practice, keep your drills small, repeatable, and tied to real constraints the way a paying client would bring them. Set a timer for 45 to 90 minutes so you practice decisions, not endless browsing.

Try a weekly rotation like this:

  • Outfit formulas: build 5 outfits from 1 hero item (for example, black blazer) using only items you already own

  • Capsule planning: make a 12 to 20 piece capsule for a specific season and budget limit (for example, add 3 new pieces max)

  • Moodboards: create one board with 3 words (for example, warm, sharp, minimal) and map each word to 3 specific garments or textures

  • Before-and-after wardrobe edits: start with 25 items, remove 8 for fit or lifestyle conflicts, then rebuild 6 outfits that solve a real week (office, errands, dinner)

Common mistake: practicing only “looks” and skipping the why. Fix it by adding 3 bullets to every deliverable: the goal, the constraints, and the exact change you made (fit, color, silhouette, or function)

Portfolio starter set you can build without clients

Next, create a starter set that shows you can style different people, not just your own taste. If you do one thing, do this: build variety with a consistent format (same template each time) so your thinking is easy to compare.

Use this starter set:

  • 3 body types: for example petite, tall, plus-size (focus on proportion and fit notes, not labels)

  • 3 color directions: one warm, one cool, one high-contrast neutral

  • 2 lifestyles: for example corporate 3 days a week and creative freelancer with travel

  • 1 full wardrobe plan: a 2-week outfit plan with repeats, laundry reality, and a small shopping list (5 items max)

Here’s the catch: this works best when you define the client’s constraints first (budget, dress code, climate, time). It fails when every project is a “dream closet” with unlimited options.

If you’re short on time, skip full capsules and do one intake + one moodboard + three outfits per scenario. That is still enough to show process and decision-making.

Choose training that is practical, structured, and career-aligned

Next, treat your training like you would a client project: if it does not include real practice and clear feedback, it is hard to know whether you can deliver results for paying clients.

A quick benchmark: you should finish a program with at least 3–5 complete, documented styling outcomes (for example, a mini capsule wardrobe plan, a wardrobe edit plan, and two outfit formulas for different lifestyles) you can show in a portfolio.

Use this checklist to spot training that translates into client-ready skills:

  • Real exercises with prompts and constraints (budget, dress code, climate, body goals)

  • Feedback on your work (from an instructor or structured peer review), not just videos

  • Body shape and color modules, with clear steps you can repeat on a client call

  • Wardrobe planning lessons (capsules, outfit formulas, shopping lists)

  • Portfolio support (templates, before/after case studies, how to present results)

Common mistake: choosing a course that is mostly inspiration boards. Fix: choose training where each module ends with a deliverable you can save, such as a client intake form, a closet edit checklist, or a shopping plan.

Also, match the program to your path so you do not pay for the wrong depth.

  • If you are a beginner, prioritize foundations: client intake, fit and proportion, color basics, outfit formulas, and a simple wardrobe plan

  • If you already style informally, prioritize advanced skills: wardrobe audits, personal shopping plans, visual identity (style direction that matches someone’s role), and photoshoot styling

Here’s the catch: advanced modules work best when you already have a repeatable process. If you are short on time, skip extra trend content and focus on one thing first: a structured wardrobe audit you can run in 60–90 minutes and document as a case study.

Closing remarks

Style is a voice. The fastest way to get consistent results for clients is to build a simple method that helps them speak clearly through what they wear, instead of chasing random outfit ideas.

So pick one skill to practice first this week and give it a time box of 30 to 60 minutes per day for 3 days. Choose one:

  • Body shapes: write 5 fit notes for a pear, rectangle, hourglass, inverted triangle, and oval

  • Color: build 2 mini palettes and match 10 items from a closet to each palette

  • Wardrobe planning: draft a 12 piece capsule for a work week with 3 shoe options

  • Client consultation: write 12 intake questions and do one 20 minute mock consult with a friend

Start learning personal styling with Milan Fashion Campus

FAQ

Can I become a personal stylist online?

Yes. You can learn fit, color, wardrobe planning, and client process online, then practice with remote clients. The key is to get feedback on your work and build a small portfolio of real before/after outfits and shopping lists.

Do I need a degree to become a personal stylist?

No. Most clients care about results, communication, and a clear process. Training helps, but it does not have to be a degree. Focus on skills you can show: styling logic, body and fit guidance, and a consistent client workflow.

What should I study first to start?

Start with foundations that affect every outfit: fit and proportions, color basics, wardrobe building, and how to do a client intake. If you do one thing first, learn how to write a simple styling brief from a client’s goals and budget.

How long does it take to become confident?

It varies, but confidence usually follows repetition and feedback. A practical pace is a few focused practice sessions per week for 8 to 12 weeks, using the same steps each time. Track decisions you made and what you would change next round.

Is personal styling different from editorial styling?

Yes. Personal styling is about the client’s daily life, comfort, budget, and repeatable outfits. Editorial styling is about a concept, storytelling, and a team brief for shoots. Skills overlap, but personal styling needs stronger consultation and wardrobe planning.